
Profile Picture Maker Guide
A practical, screen-by-screen walkthrough of the studio: create an account, generate a finished profile photo, manage credits, and find every result, plan, and invoice afterward. Each section matches what you will actually see on screen.
No section matches that search. Try “passport”, “credits”, or “download”.
Start here
Profile Picture Maker is a signed-in studio for profile photos. You upload a portrait, choose a tool from the left sidebar, and download a finished image that is meant to be used as an avatar, a social profile, a passport print, or a designed frame.
The product keeps your face as the subject. AI Photo Generation can restyle clothing, light, and background while holding facial identity. AI Anime Photo redraws that same person in a chosen illustration style. Retouching repairs damage. Background Remover cuts the person out and places them on a set of looks. Social Photo Generation and Photo Template do their crop, resize, and layout in your browser, so they are the tools to use when you already like the picture and only need the right size or frame.
After you sign in, the left sidebar is the map. Overview is the home screen. Under it are the studios turned on for your workspace. On the workspace used for this guide those are AI Photo Generation, AI Photo Retouching, AI Anime Photo, Professional AI Headshots, Background Remover, Photo Filtering, Social Photo Generation, Photo Template, and Passport Photo Maker. After the studios come My generations, Profile generation cost, Billing history, Pricing plans, and Subscription. A tool the workspace has switched off does not appear. Team members on someone else’s plan do not see billing, pricing, subscription, or the cost ledger. The top bar shows your credit balance, notifications, and your account menu. If the email is not confirmed yet, Email Verify sits in that bar too.
Create an account
The usual path starts on the Welcome back card. Enter an email and press Continue. If that address is new, the same card turns into “Create your account” and asks for a username, a password, and a retyped password.
You can also open the full registration screen directly. That form is titled “Create your account” and says a 6-digit code will be emailed. Continue with Google is the top button. Email signup asks for your name, email, region, password, and password confirmation. Region is required. Pick the region that matches where you work. The two password fields must match. Create account submits the form.
Use an email you can open. The next screen asks for the 6-digit code from that inbox. The dashboard stays closed until the code is accepted. After that you land on Overview.
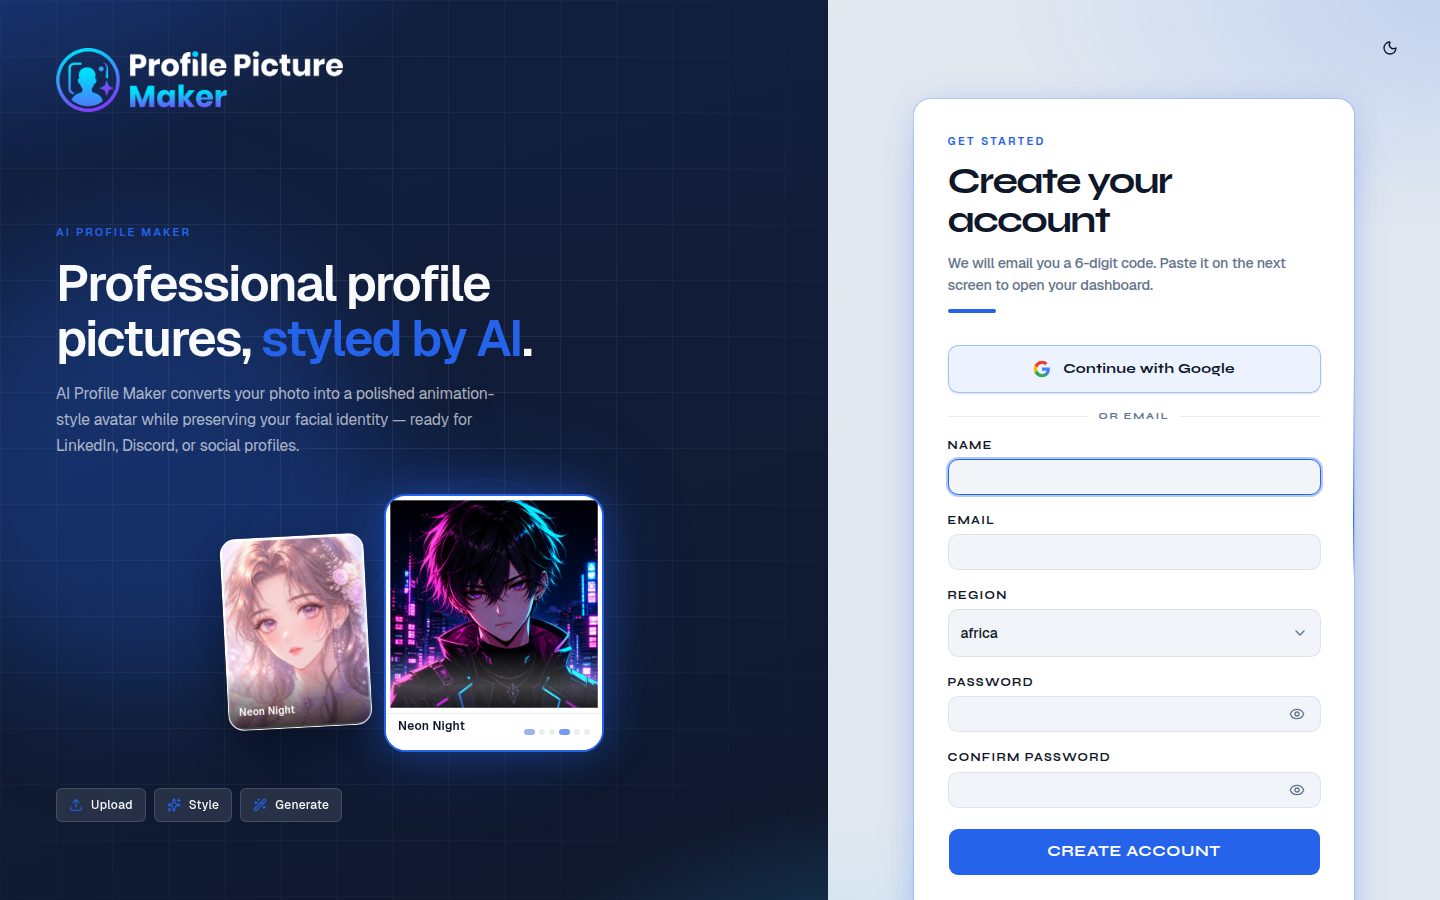
Full registration. Google is at the top. Email signup continues with name, email, region, and both password fields. The note under the title is the 6-digit code step.
Sign in
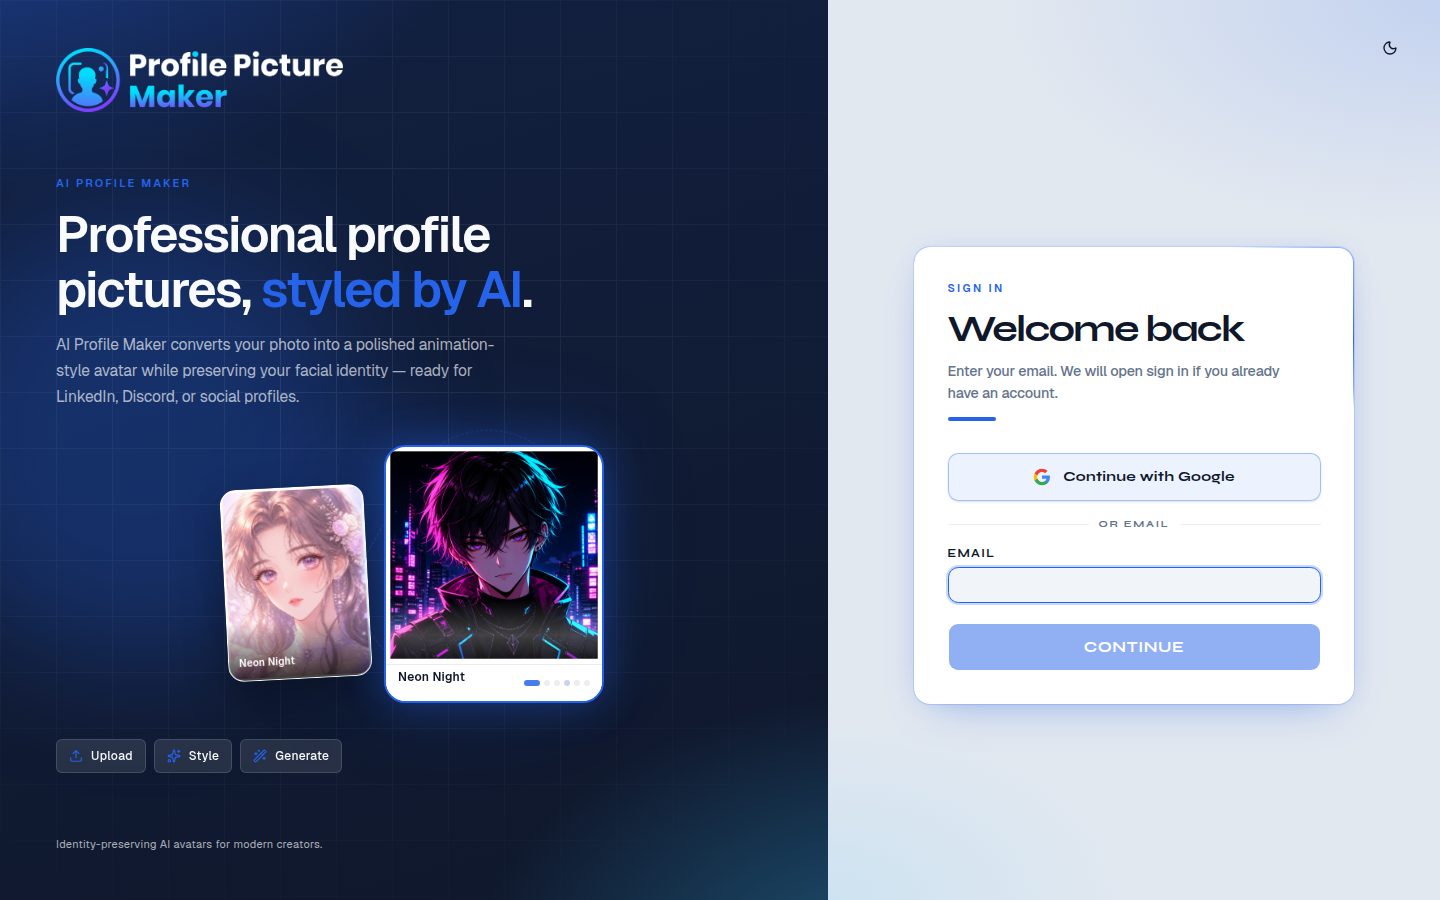
Returning members start on the Welcome back card. The first step is only the email. Continue checks that address. If it already belongs to an account, the card asks for the password. If it is new, the card becomes the short create-account form.
Continue with Google uses the Google account linked to the membership. After the email check, Forgot? sits on the password row and opens password recovery. Remember me keeps the session on that browser. Sign in opens the studio. The moon control at the top of the guest screen switches that page between light and dark.
 1
2
3
- 1Continue with Google signs in with the Google account linked to your membership.
- 2Email is the only field on the first step. The password appears after Continue finds an existing account.
- 3Continue opens the password step, or the create-account fields when the email is new.
Reset a password
Account recovery asks only for the email on the account. Email reset link sends a message with a secure link. Open that link, choose a new password, confirm it, and return to sign in.
If the message does not arrive, check the spam folder and confirm you typed the same email used at registration. Google-only accounts should use Continue with Google instead of a password reset. Back to sign in returns you to the Welcome back card without changing anything.
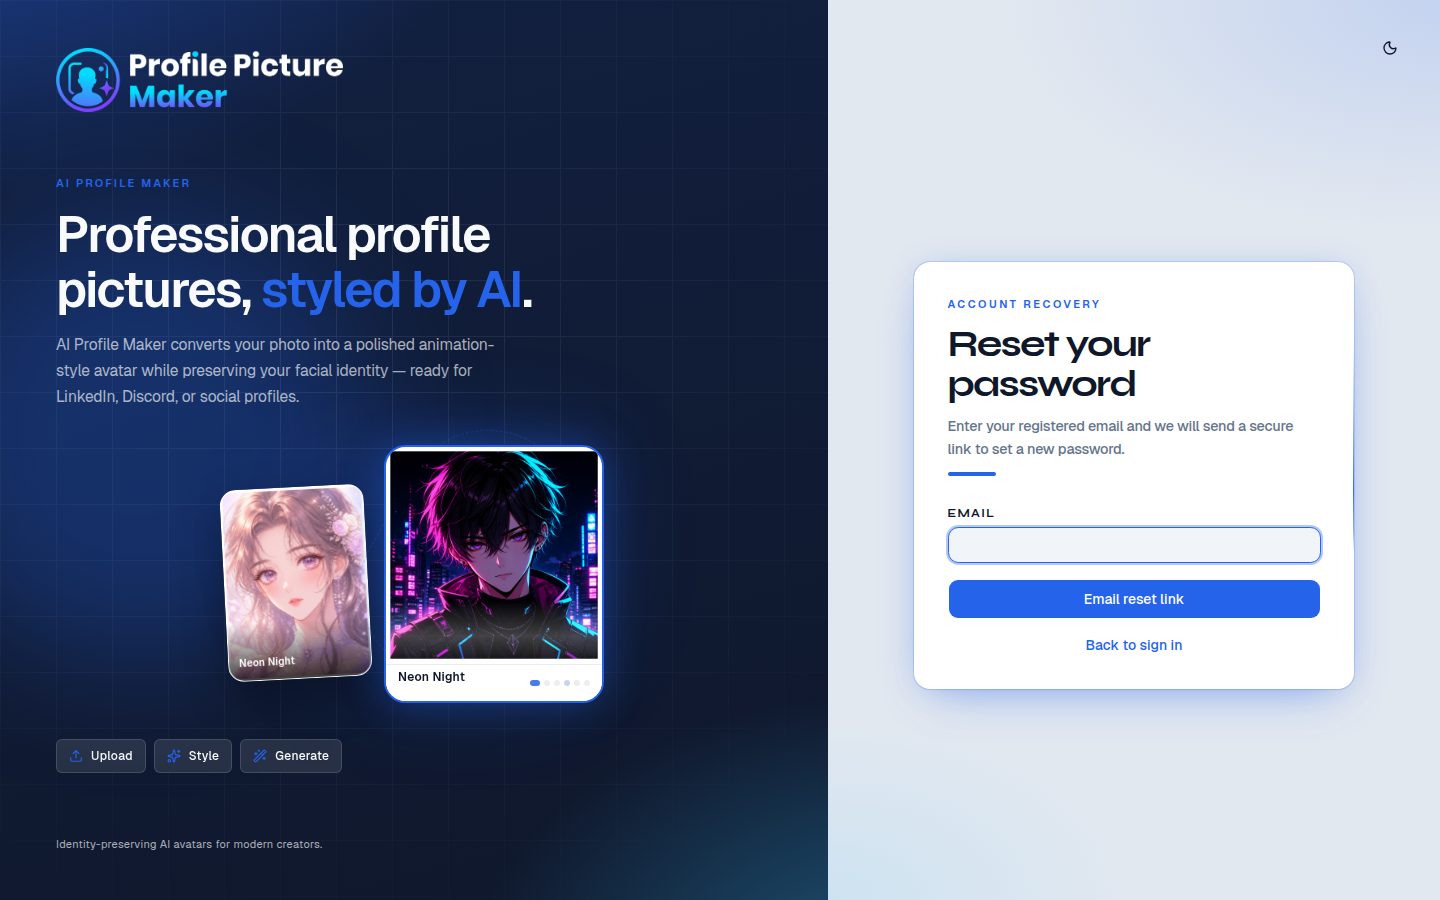
Password recovery. Enter the registered email, then use the link from that inbox. Back to sign in returns to the Welcome back card.
Verify your email
A new email account confirms the address with a 6-digit code before the dashboard opens. The screen is titled “Enter your code.” Paste the code from the message. It has to be six digits. The button stays off until the field is full. Resend code sends a fresh message if the first one is missing.
Check spam, and make sure you are reading the inbox for the address you just registered. A wrong code stays on this screen so you can try again. Google sign-in uses the Google account itself and does not ask for this code.
Someone who buys a plan from the public pricing page, before they have an account, follows a different order. Stripe checkout finishes first. The next screen is “Create your password”: the email from checkout is already filled in, you choose a password, retype it, and press Continue to dashboard. That account can open the studio immediately. Email Verify then appears in the top bar. Send a 6-digit code to the same email and enter it in the dialog to confirm the address.
Read the Overview
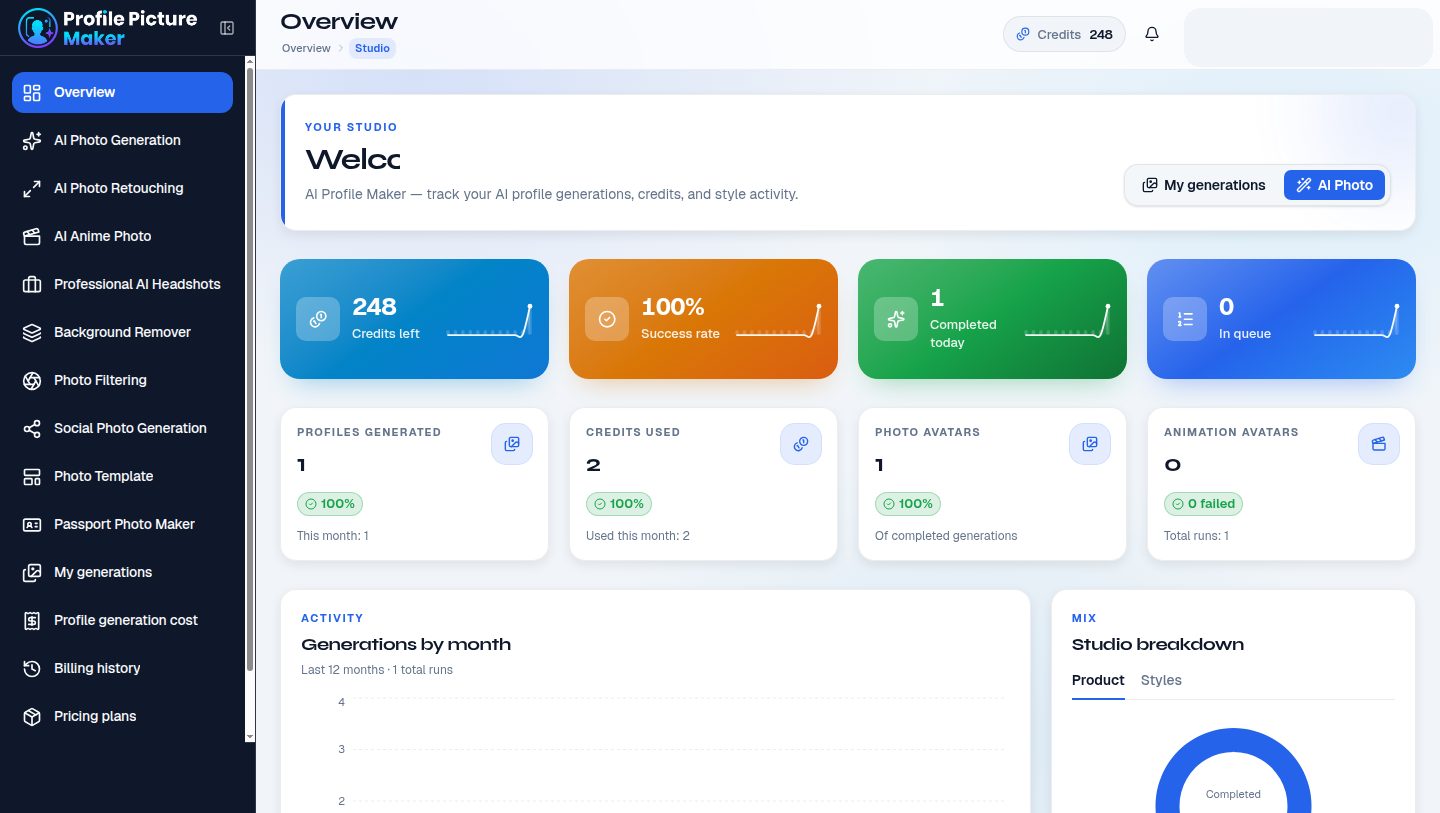
Overview is the home screen after sign-in. The heading greets you by name and describes the page as the place to track generations, credits, and style activity. Two shortcuts sit on the right of that greeting: My generations and AI Photo.
Four colored cards summarize the account right now. Credits left is the balance you can spend. Success rate is the share of runs that finished. Completed today counts finished work since the day started. In queue counts work that is still pending or processing. Under those cards, smaller totals show profiles generated, credits used, photo avatars, and animation avatars, each with a short comparison for the current month.
The lower half is activity. Generations by month is a 12-month chart of how many runs you made. Studio breakdown splits completed work by product, with a Styles tab beside Product. Use this page to decide whether you have credits before you start a long session, and to see whether a recent run is still in queue.
 1
2
3
4
- 1Sidebar. Enabled studios, then My generations, Profile generation cost, and billing. The blue row is the page you are on. The account chip is hidden in this screenshot.
- 2Credits left. Spend this balance on AI runs. Success rate, completed today, and in queue sit beside it.
- 3Shortcuts jump to the library or straight into AI Photo Generation. The top bar also shows the same credit balance.
- 4Activity. Monthly volume on the left, product mix on the right.
How credits and the free plan work
A free account has no credit balance. It can still create one AI Photo or one Professional Headshot each calendar month, and two filtered photos at a time. Each filter use comes back 24 hours after you spend it. The studio prints the remaining allowance above the button, for example “Free plan: 1 AI Photo or Professional Headshot left this month” or “2 of 2 daily free filters left.”
The other studios are on a paid plan. Background Remover, AI Photo Retouching, AI Anime Photo, Social Photo Generation, Photo Template, Passport Photo Maker, UpScale Image, and Animated GIF Profile show a short notice and a View plans link when the account has no active plan. The generate button stays off until you subscribe.
Paid plans spend credits. The cost is printed above the action button, next to the remaining balance, before you submit. On the workspace used for this guide, AI Photo Generation showed 10 credits and Photo Filtering showed 2 credits for a generation. Read the number on your own screen, because a workspace can set a different cost. A zero balance turns the paid action off until the plan refills it. The top bar repeats the balance on every studio.
Pricing plans lists Monthly, Yearly, and Lifetime. Each card shows the price, the account limit, included tools, and, on higher cards, premium features such as custom image search, selected AI studios, and team invitations. Subscribing opens checkout. After payment, Subscription shows the active plan, and Billing history keeps the payment and the invoice. You can also buy from the public pricing page without signing in first. That path is described under Pricing plans.
AI Photo Generation
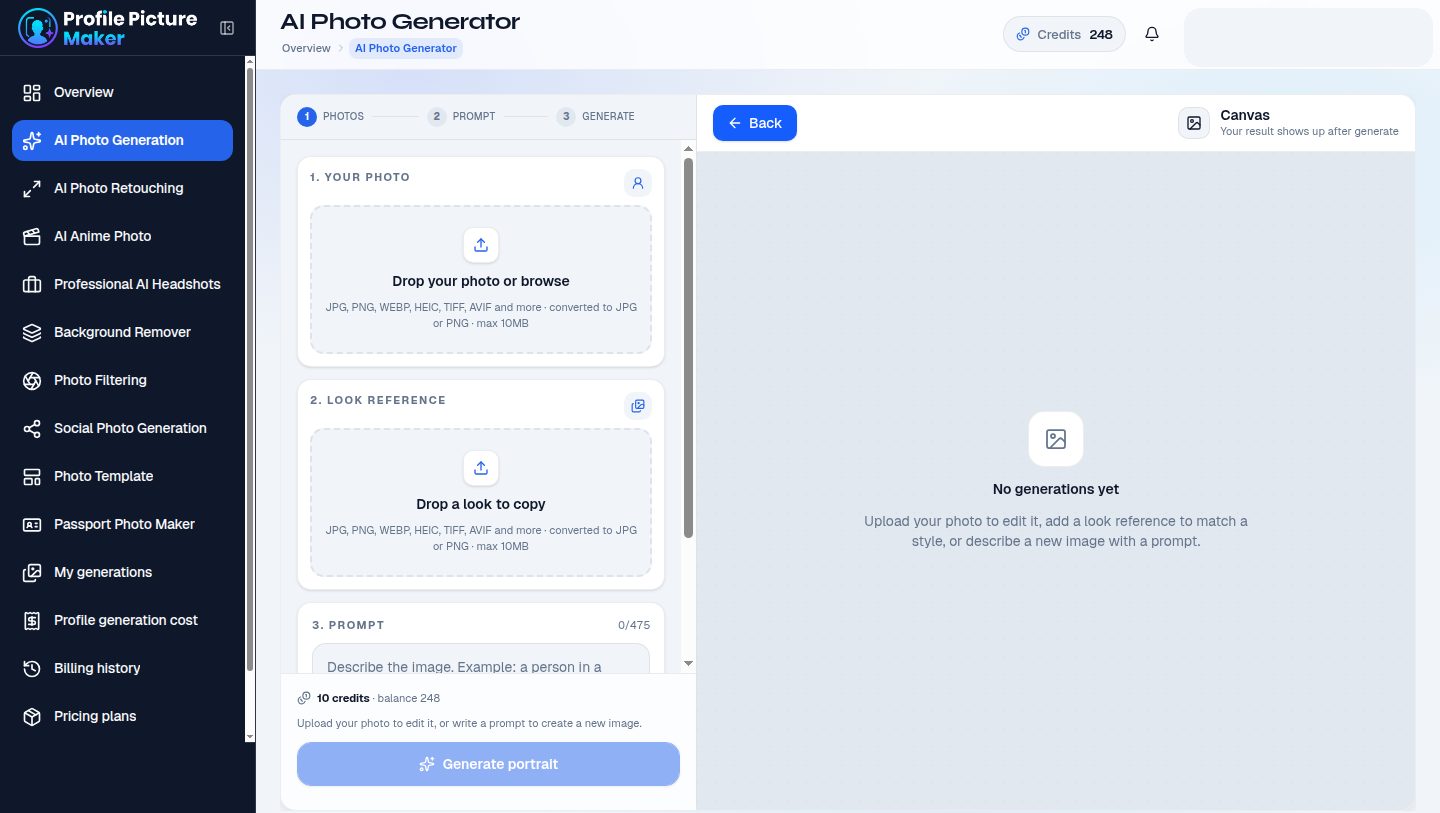
This studio makes a profile portrait. The left column is a three-step form: Photos, Prompt, Generate. The right side is the canvas, which stays empty until a result is ready.
Your photo is the person who should appear in the result. Drop a file or browse. The studio accepts a normal photo up to 10 MB and converts it to JPG or PNG before it runs. Look reference is optional. It is a second picture whose clothing, background, lighting, and scene you want copied. When a look reference is attached, the studio applies that look automatically and keeps your face. The button then reads Match this look. A prompt is optional in that mode. You can still add a short note, for example “warmer light, keep the navy suit from the reference.”
If you upload only your photo, the prompt is required. Describe wardrobe, lighting, and backdrop, not a new face. A useful line is “soft studio background, navy blazer, keep my face unchanged.” The prompt needs at least a few words and stays within the character count shown at the top of the box. With a photo attached, that limit is 1,000 characters. Facial identity is preserved as part of the edit.
You can also write a prompt with no photo at all. That creates a new image from the description only. Nothing from your camera roll is sent. The limit in that mode is the smaller count shown on the empty form, 475 characters on this workspace, and the button reads Generate image. Prompt-only generation has to be enabled for the studio; if it is off, the form tells you.
The button label follows the mode. Generate portrait edits the uploaded photo. Match this look is used when a look reference is attached. Generate image is the prompt-only run. While the job runs, the label changes to a working state. When it finishes, the canvas can show Edited, Original, and Side by side, so you can judge the change before you download. A later edit of that same result can be saved back to the library. If the button is disabled, the line under it explains why: the prompt is too short, the prompt is too long, the photo is missing, the studio is unavailable, this month’s free photo is already used, or the credit balance is empty.
 1
2
3
4
5
- 1Your photo. The face that should stay. Drop a file or browse. Max 10 MB.
- 2Look reference. Optional. Clothing, light, and scene are copied from this picture.
- 3Prompt. Required when you are editing your photo or creating from text. Optional when a look reference is already attached.
- 4Generate portrait. The label becomes Match this look or Generate image in the other modes. The credit cost and balance sit just above the button.
- 5Canvas. The finished portrait appears here, with compare controls after a successful run.
AI Photo Retouching
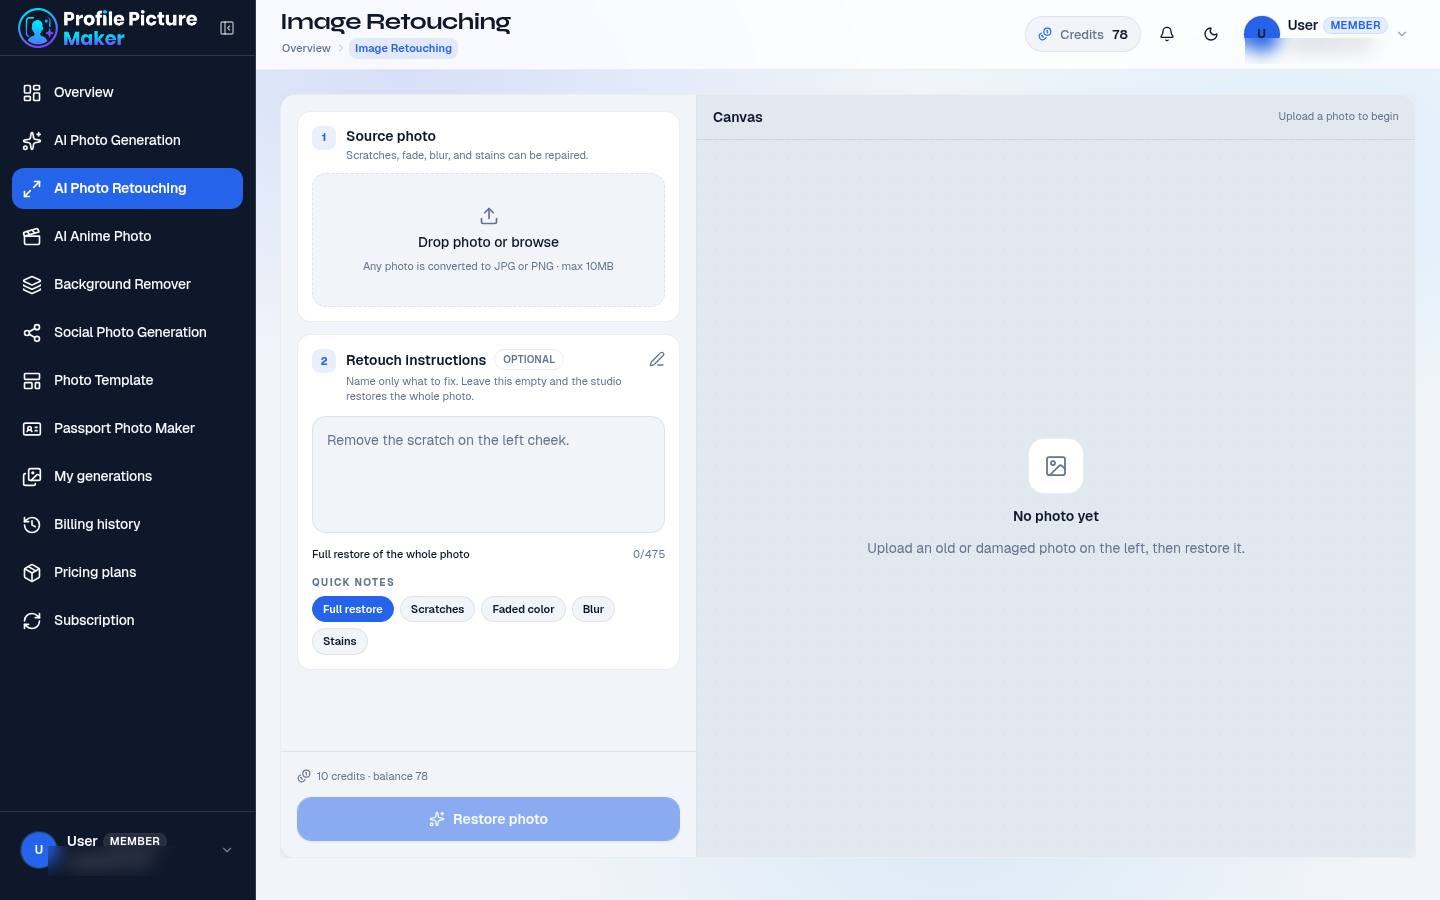
AI Photo Retouching repairs a photo you already have. It is the right tool for scratches, fade, stains, blur, or a yellowed print. It is not a style transfer. The person, the crop, and the scene stay in place while the damage is cleaned.
Start with the source photo. The hint on the card says scratches, fade, blur, and stains can be repaired. Then write retouch instructions, or leave them empty. An empty instruction means a full restore of the whole photo. If you name one problem, the studio limits itself to that problem. A clear instruction is “Remove the scratch on the left cheek.” The character count is shown beside the box.
Quick notes fill the instruction box for you. Full restore, Scratches, Faded color, Blur, and Stains are the chips under the text box. Pick the closest one, then edit the sentence if you need to be more specific. Restore photo starts the job. The canvas says “No photo yet” until you upload, then shows the restored image when the run completes. The credit line above the button uses the same pattern as AI Photo Generation.
 1
2
3
4
- 1Source photo. The damaged picture. A clear scan of a print works better than a photo of a photo taken at an angle.
- 2Instructions. Optional. Leave blank for a full restore, or name the single flaw to fix.
- 3Quick notes insert a ready-made instruction: full restore, scratches, faded color, blur, or stains.
- 4Restore photo runs the repair. Cost and balance are printed above it.
AI Anime Photo
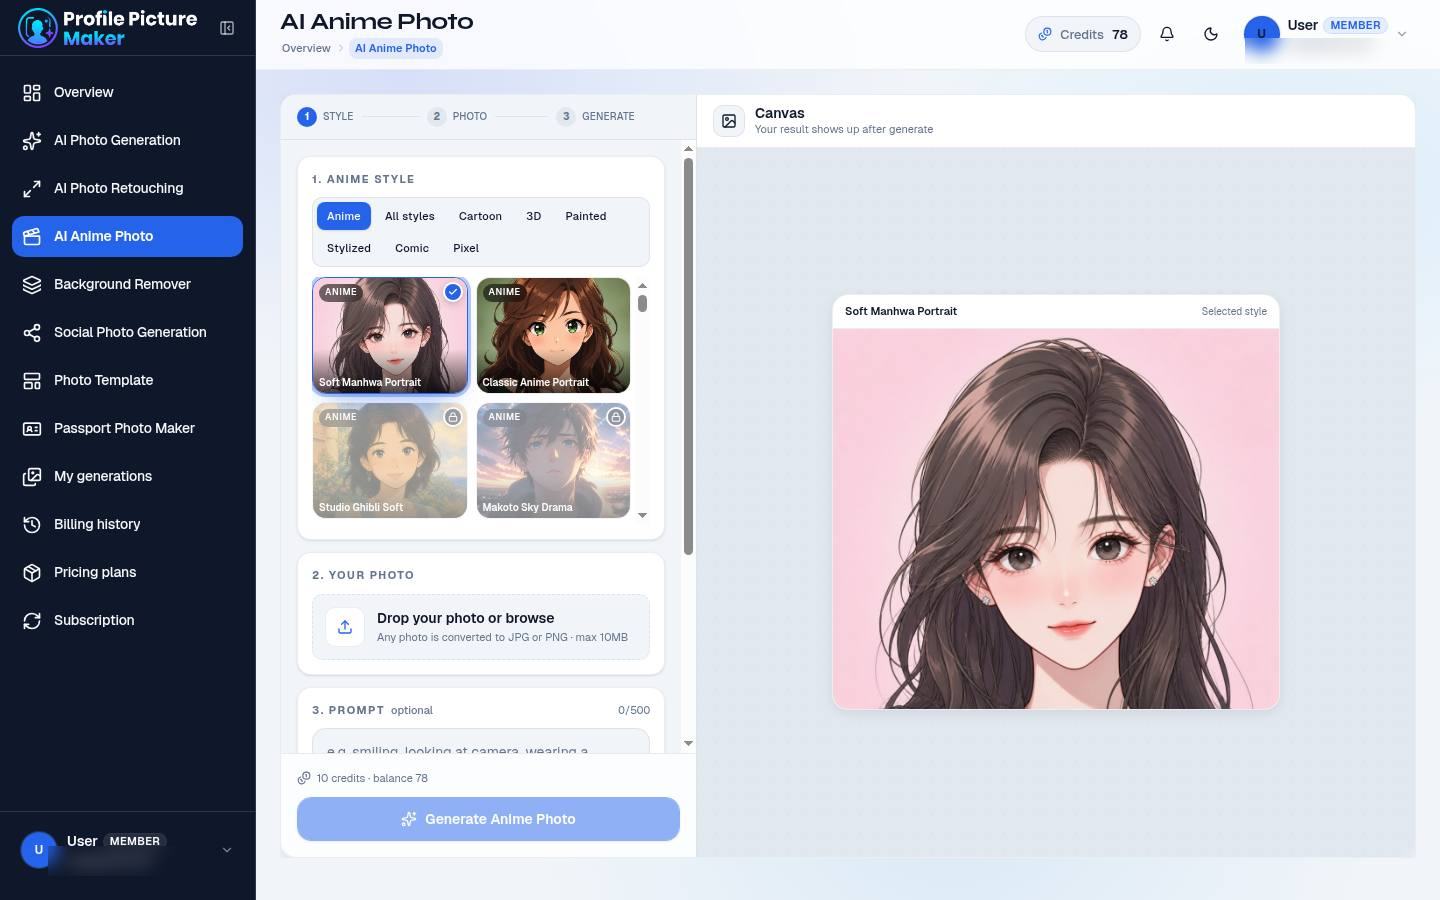
AI Anime Photo redraws your portrait in an illustration style. You pick the style first, then the photo, then an optional prompt. The canvas previews the style you selected so you can judge the line work and color before you spend credits.
Styles are grouped with chips: Anime, All styles, Cartoon, 3D, Painted, Stylized, Comic, and Pixel. The grid shows a preview tile and the style name, such as Soft Manhwa Portrait, Classic Anime Portrait, Studio Ghibli Soft, or Makoto Sky Drama. A selected tile is marked. A locked tile cannot be chosen. Scroll the grid if the style you want is lower down.
Your photo should be a clear portrait. The same 10 MB upload rule applies. The prompt is optional and is there for pose, expression, or wardrobe, for example a smile or a jacket. The counter on this screen allows up to 500 characters. Generate Anime Photo starts the run. The credit cost is shown with your balance. When the result arrives you can download it, and on supported browsers you can share the result link. Finished anime photos also appear in My generations beside the original.
 1
2
3
4
- 1Style filters narrow the grid. All styles shows the full set.
- 2A style tile. The check mark is the one that will be used. Locked tiles stay unavailable.
- 3Your photo and the optional prompt sit under the grid. Scroll the left column to reach them.
- 4Selected style preview on the canvas, before your own photo is generated.
Professional AI Headshots
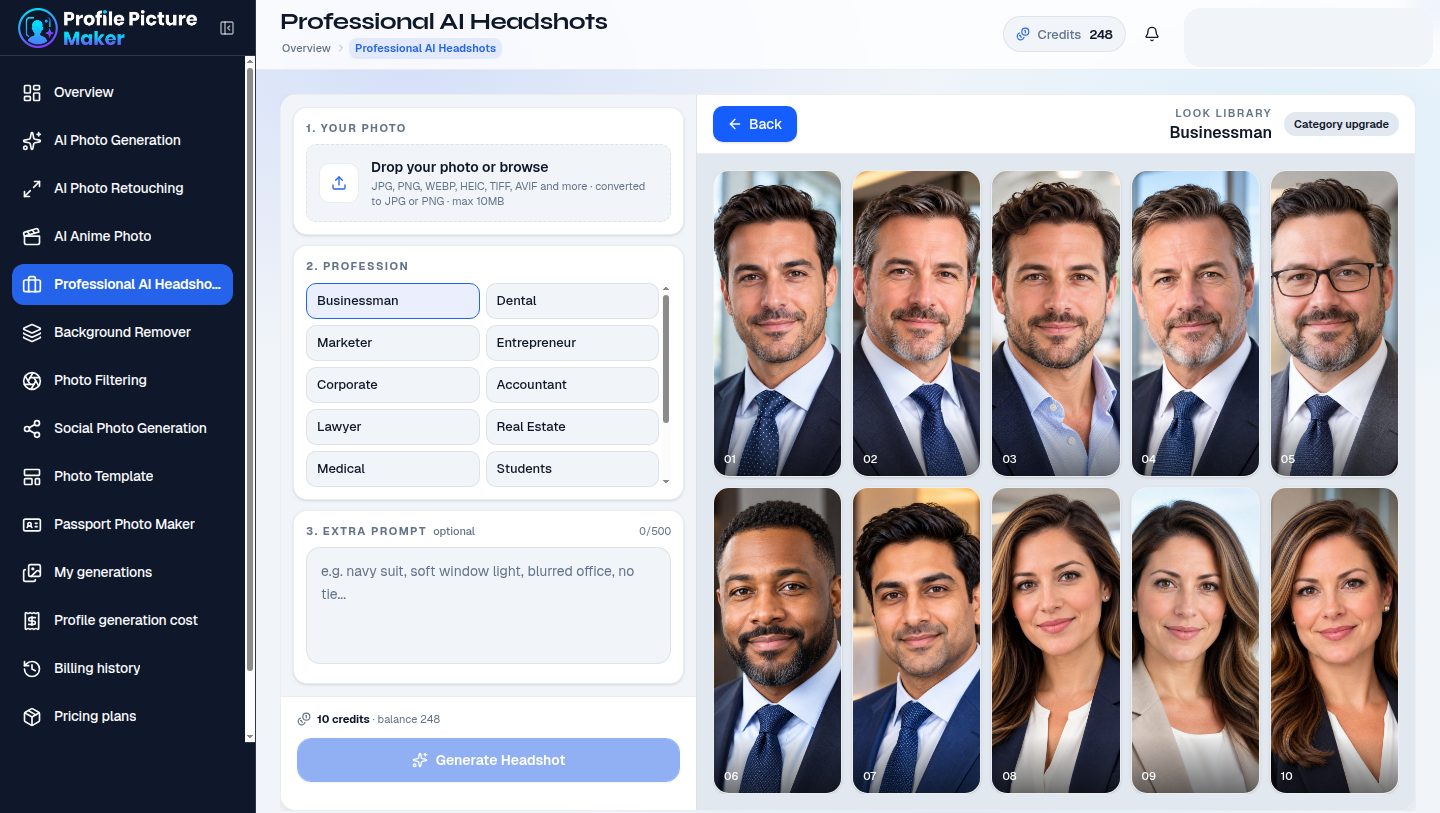
Professional AI Headshots dresses your photo for a job. Clothing, setting, and light change. The face stays the same. The form has three steps: Your photo, Profession, and an optional extra prompt. The right side is the look library.
Drop a clear portrait, the same 10 MB upload used by the other studios. Then pick a profession. The list on this workspace includes Businessman, Dental, Marketer, Entrepreneur, Corporate, Accountant, Lawyer, Real Estate, Medical, Students, Teachers, LinkedIn, and Professional. The look library on the right fills with example portraits for that profession.
Click an example when you want that outfit, background, and crop copied onto your face. The badge then reads Example match. Leave every example unselected and the badge stays Category upgrade: the studio builds the strongest headshot for that profession without copying one sample. The extra prompt is optional, up to 500 characters, for a note such as “navy suit, soft window light, blurred office, no tie.” Generate Headshot starts the run. A free account uses this studio or AI Photo Generation for the one monthly photo. A paid account sees the credit cost and balance above the button.
 1
2
3
4
5
- 1Your photo. The face that stays. Drop a file or browse.
- 2Profession. The selected row is the look that will be applied. Scroll for the rest of the list.
- 3Extra prompt, optional. Use it for suit color, light, or a detail the profession recipe should keep.
- 4Generate Headshot. The credit cost and balance sit just above the button on a paid account.
- 5Look library. Click a sample for Example match. With none selected, the run is a Category upgrade.
Background Remover
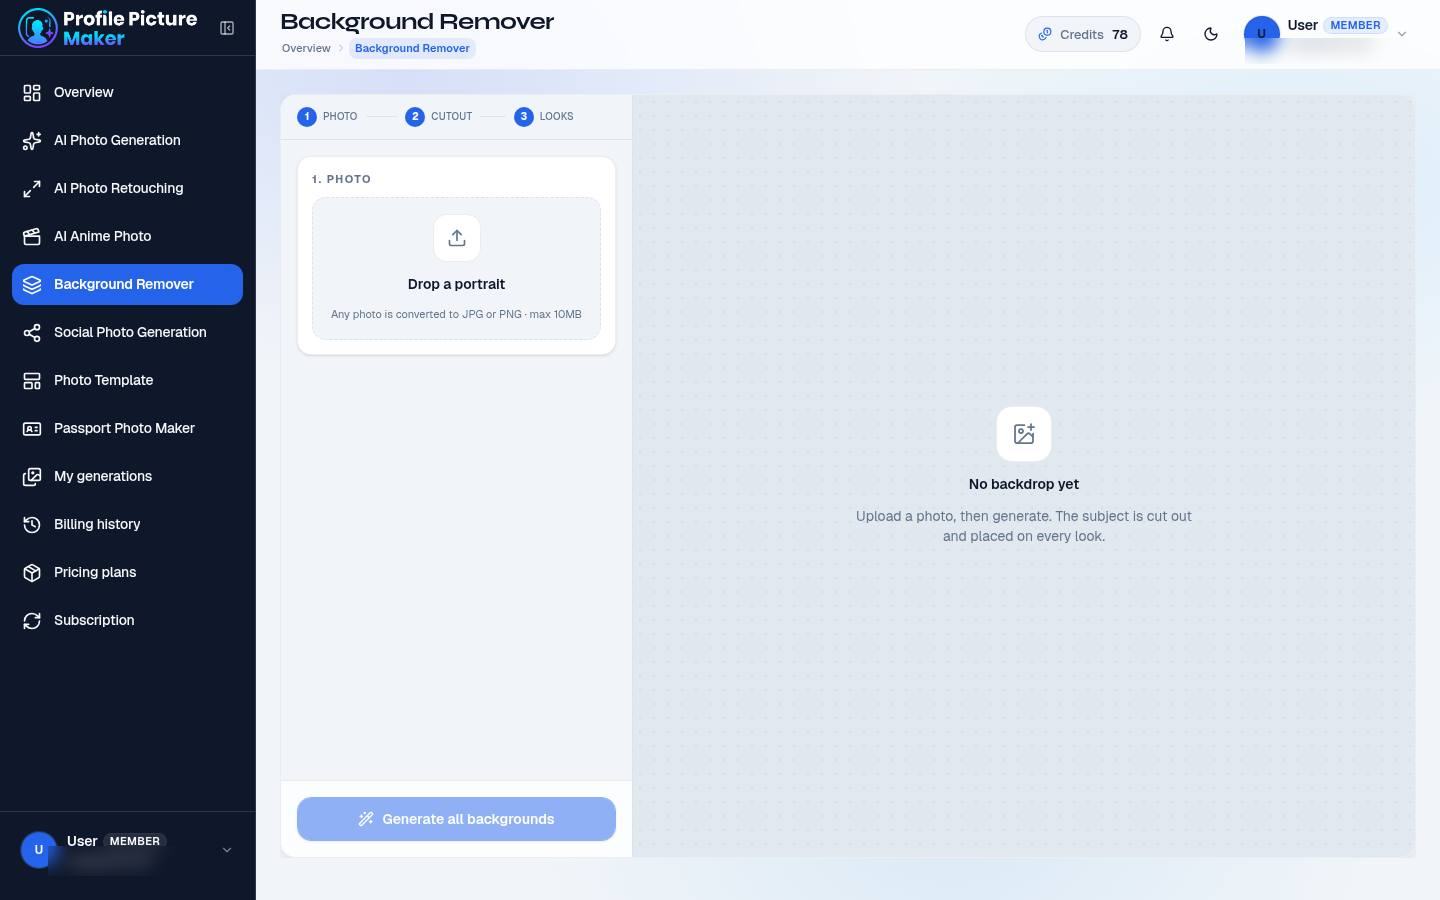
Background Remover separates the person from the original scene and builds a gallery of new looks. The steps on the form are Photo, Cutout, and Looks. You do not pick a single color first. You upload once, then generate the whole set.
Drop a portrait in the photo card. A front-facing picture with some space around the hair and shoulders cuts more cleanly than a tight crop or a busy group photo. Generate all backgrounds starts the cutout and fills the canvas with looks. After the gallery exists, the left column gains category chips so you can filter the set, and the canvas header shows which results are on the current page.
Choose one look to open the editor. The editor is where you adjust that version and save it. Close editor returns you to the gallery. Generate again rebuilds the set from the current photo. Change photo replaces the source before a new run. The empty canvas tells you the subject will be cut out and placed on every look, which is the whole point of this studio.
 1
2
3
- 1Photo. One portrait feeds every background.
- 2Generate all backgrounds builds the gallery. The label changes to Generate again after the first run.
- 3Canvas. Looks appear here. Open Editor on a selected look to adjust and save it.
Photo Filtering
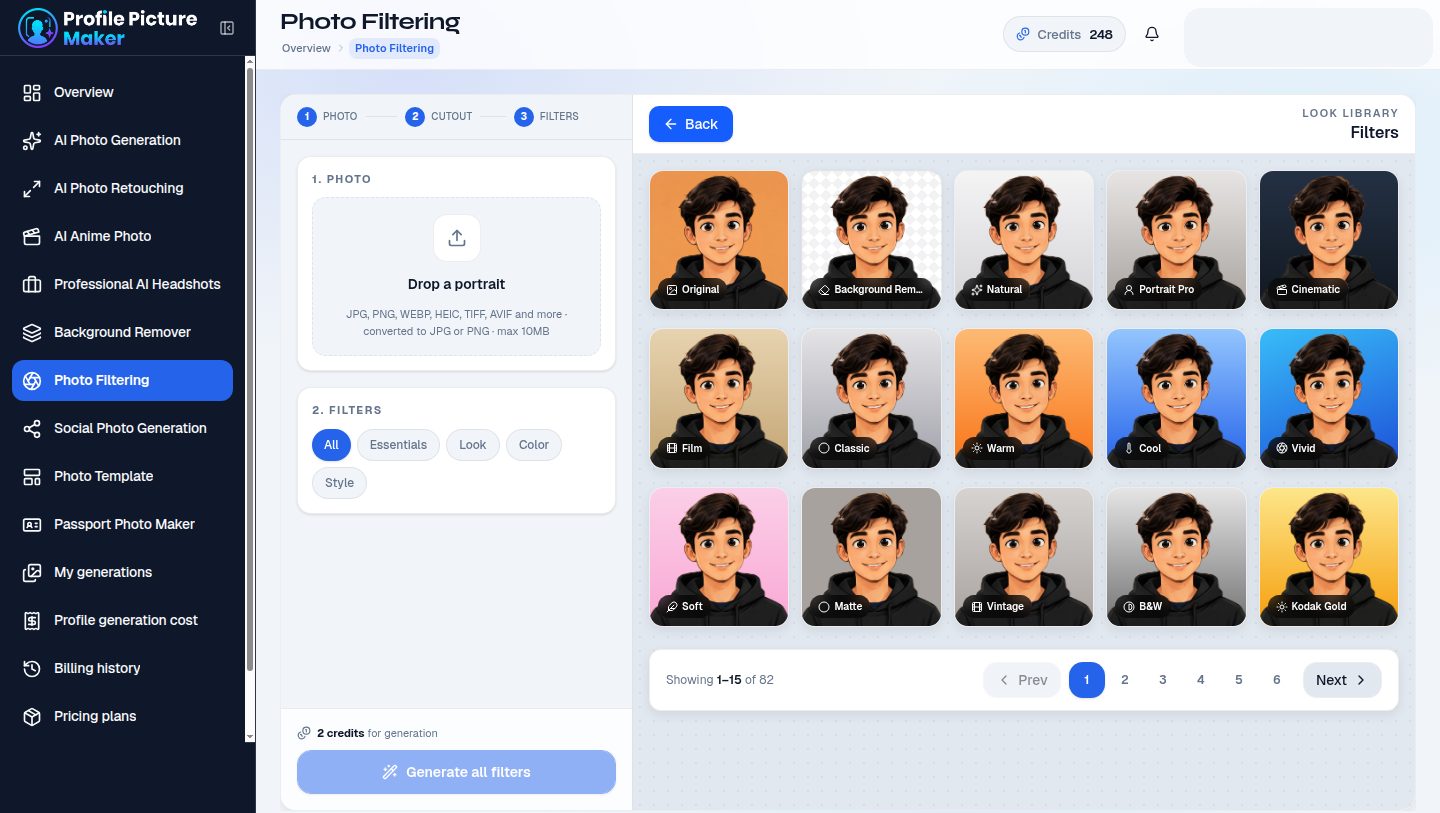
Photo Filtering places your portrait on a gallery of color and style looks. The steps on the form are Photo, Cutout, and Filters. You upload once, then generate the set. This is a filter pass on your photo, not a new face.
Drop a portrait in the photo card. Category chips narrow the gallery: All, Essentials, Look, Color, and Style. Generate all filters builds the looks. The canvas header is the look library, and the footer counts the page, for example “Showing 1–15 of 82,” with Prev and Next. Open a look to adjust it, download that file, or save it to My generations. Generate again rebuilds the set. Change photo replaces the source.
A free account can keep two filtered photos at a time. The line above the button counts how many are left, and one comes back 24 hours after you use it. When both are used, the button is replaced by a notice and View plans. A paid account sees the credit cost for the generation instead.
 1
2
3
4
- 1Photo. One portrait feeds the whole gallery.
- 2Filter categories. All, Essentials, Look, Color, and Style.
- 3Generate all filters. The credit line, or the free daily count, sits above the button.
- 4Look library. Page through the set, then open a look to download or save it.
Photo Template
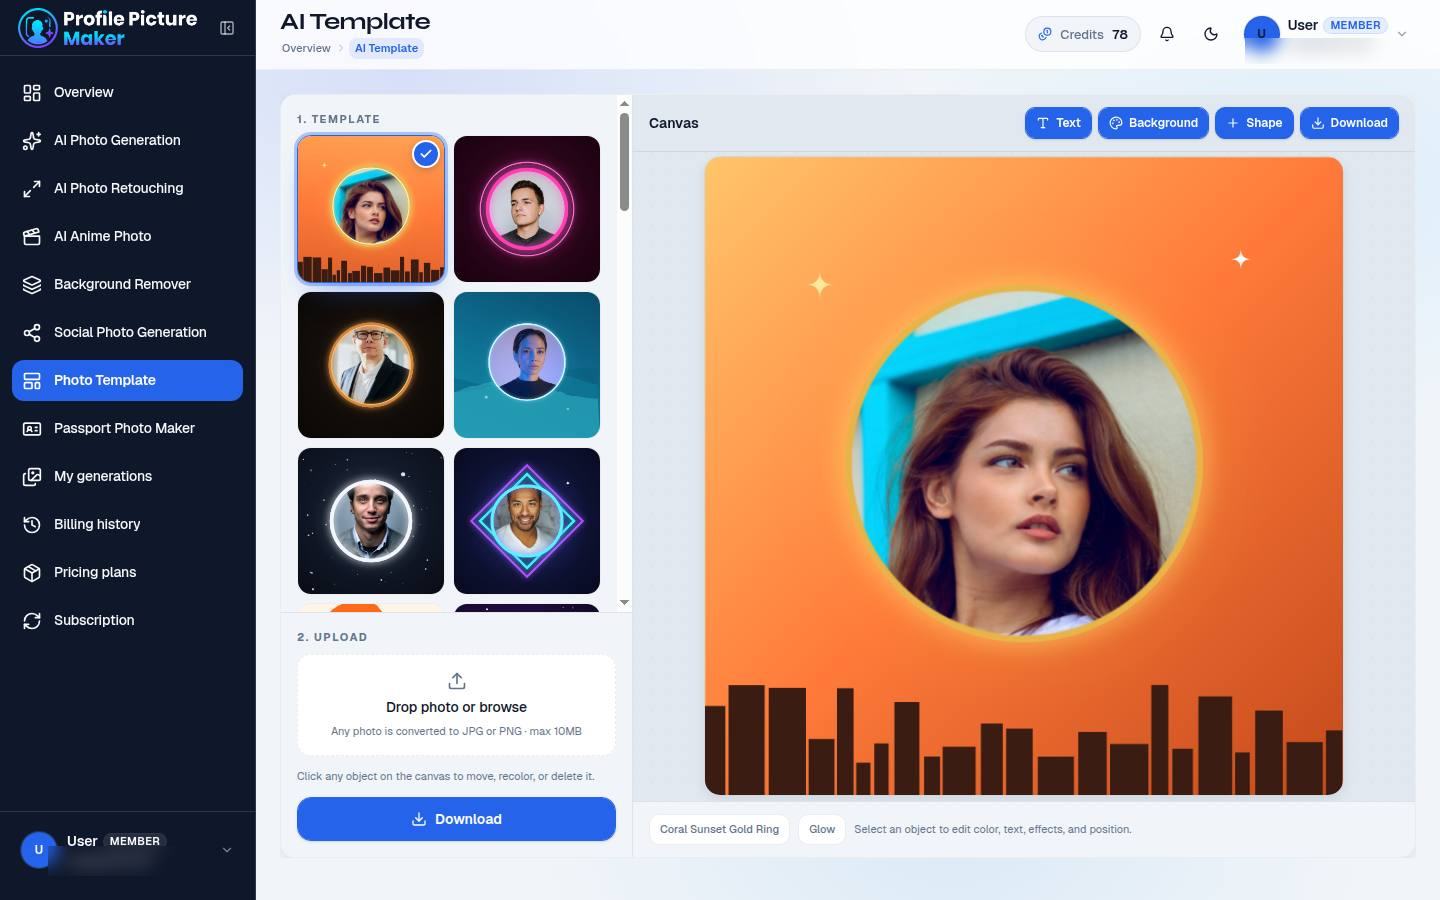
Photo Template drops your portrait into a finished frame: rings, glow, color blocks, and poster layouts. The page title in the studio is AI Template. You design on the canvas and download a PNG. This is a layout tool, not a new AI portrait.
Pick a template from the grid. The selected tile shows a check. The canvas updates to that frame immediately, using a sample portrait until you upload your own. Drop your photo in the upload card. The same 10 MB rule applies, and the file is converted to JPG or PNG.
The canvas tools are Text, Background, Shape, and Download. Click an object on the canvas to move it, recolor it, or delete it. The status line under the canvas names the selected object, for example a glow treatment, and reminds you that color, text, effects, and position can change. Download saves a PNG named from the template. Use that PNG as the source for Social Photo Generation if you still need a network’s exact pixel sizes.
 1
2
3
4
- 1Template grid. The check mark is the frame on the canvas.
- 2Upload replaces the sample portrait with yours. Download is also at the bottom of this column.
- 3Text, Background, Shape, and Download edit the canvas and export the PNG.
- 4Canvas. Click the ring, the photo, or another object to change it.
Passport Photo Maker
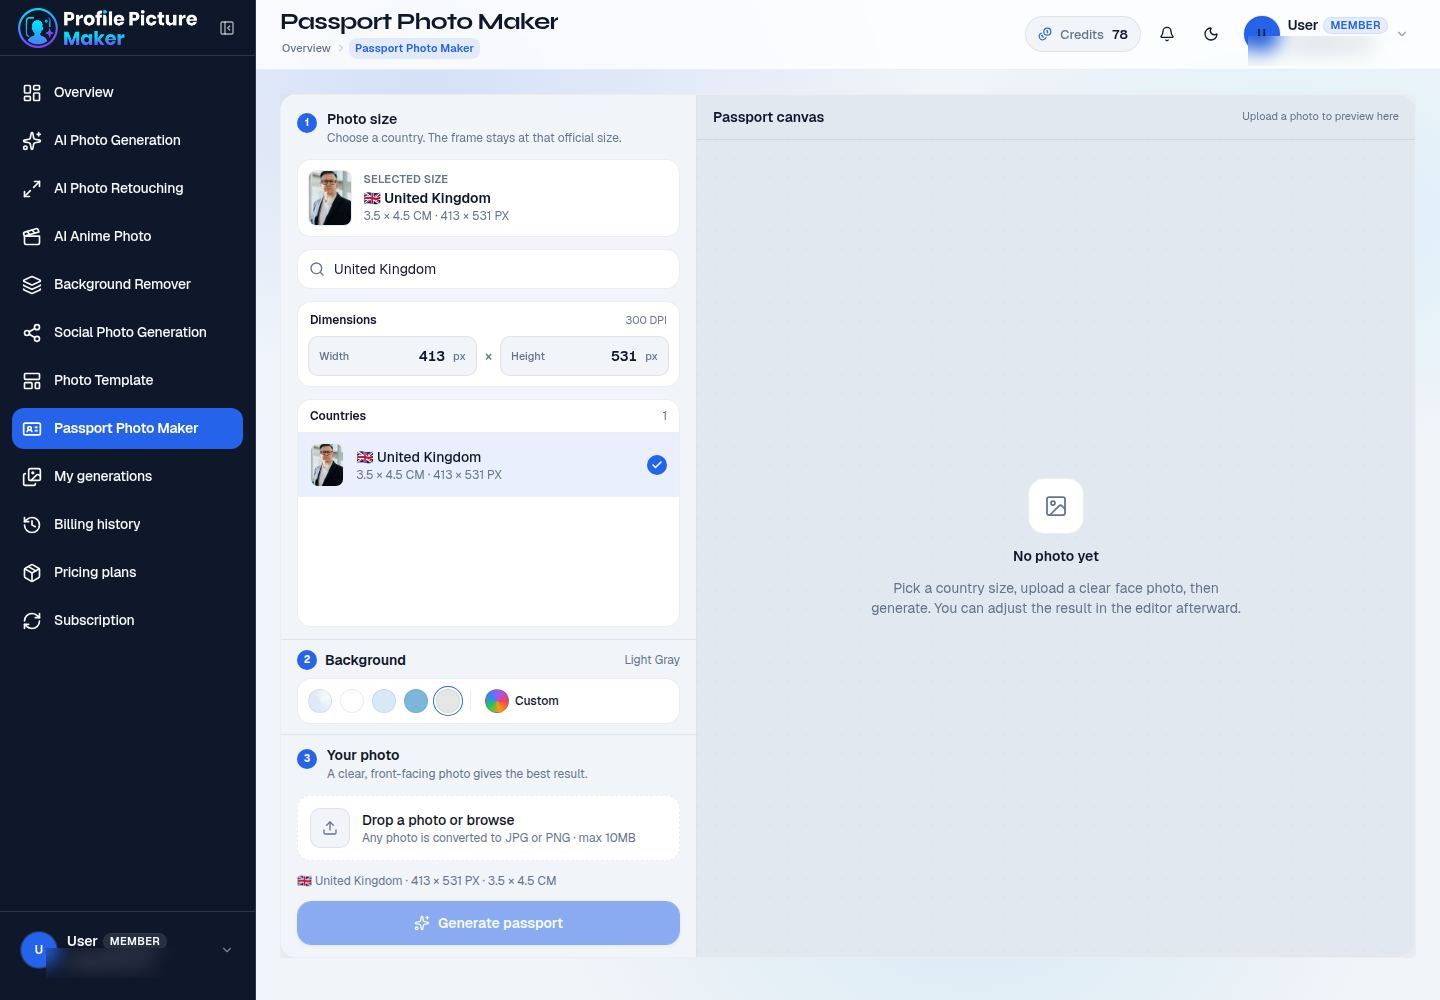
Passport Photo Maker builds a print-sized portrait for a specific country. The frame stays at that country’s official size. Dimensions are calculated at 300 DPI, so a 35 × 45 mm photo is 413 × 531 pixels. The country list on this screen contains about one hundred entries, and you can search by country or by size.
Choose the country first. The selected-size card shows the name, the print size, and the pixel size. You can still read the width and height underneath. Then choose the background the authority expects. The choices are Original, White, Light Blue, Blue, Light Gray, and Custom. Original keeps the photo’s own backdrop. The other swatches fill a flat color behind the face. Many European sizes default toward light gray; many others default to white. Follow the card for the country you selected rather than guessing.
Upload a clear, front-facing photo. Hair should not cover the eyes, and the camera should be at eye level. Generate passport builds the sheet. The canvas text says you can adjust the result in the editor afterward, which is where you nudge the crop so the head size and the space above the hair match the rules you are applying for. Download the finished file from the result. This guide cannot guarantee that a government will accept a photo. The studio gives you the published size and a plain background. Local rules about glasses, expression, and recency still apply.
 1
2
3
4
- 1Photo size. Search “United Kingdom” and the list keeps that one official size: 3.5 × 4.5 cm, 413 × 531 px.
- 2Background sits on its own row. Light Gray is selected here. The other swatches are Original, White, Light Blue, Blue, and Custom.
- 3Your photo, then Generate passport. A front-facing portrait gives the cleanest crop.
- 4Passport canvas. The preview appears here after you upload. You can adjust the crop in the editor after generation.
My generations
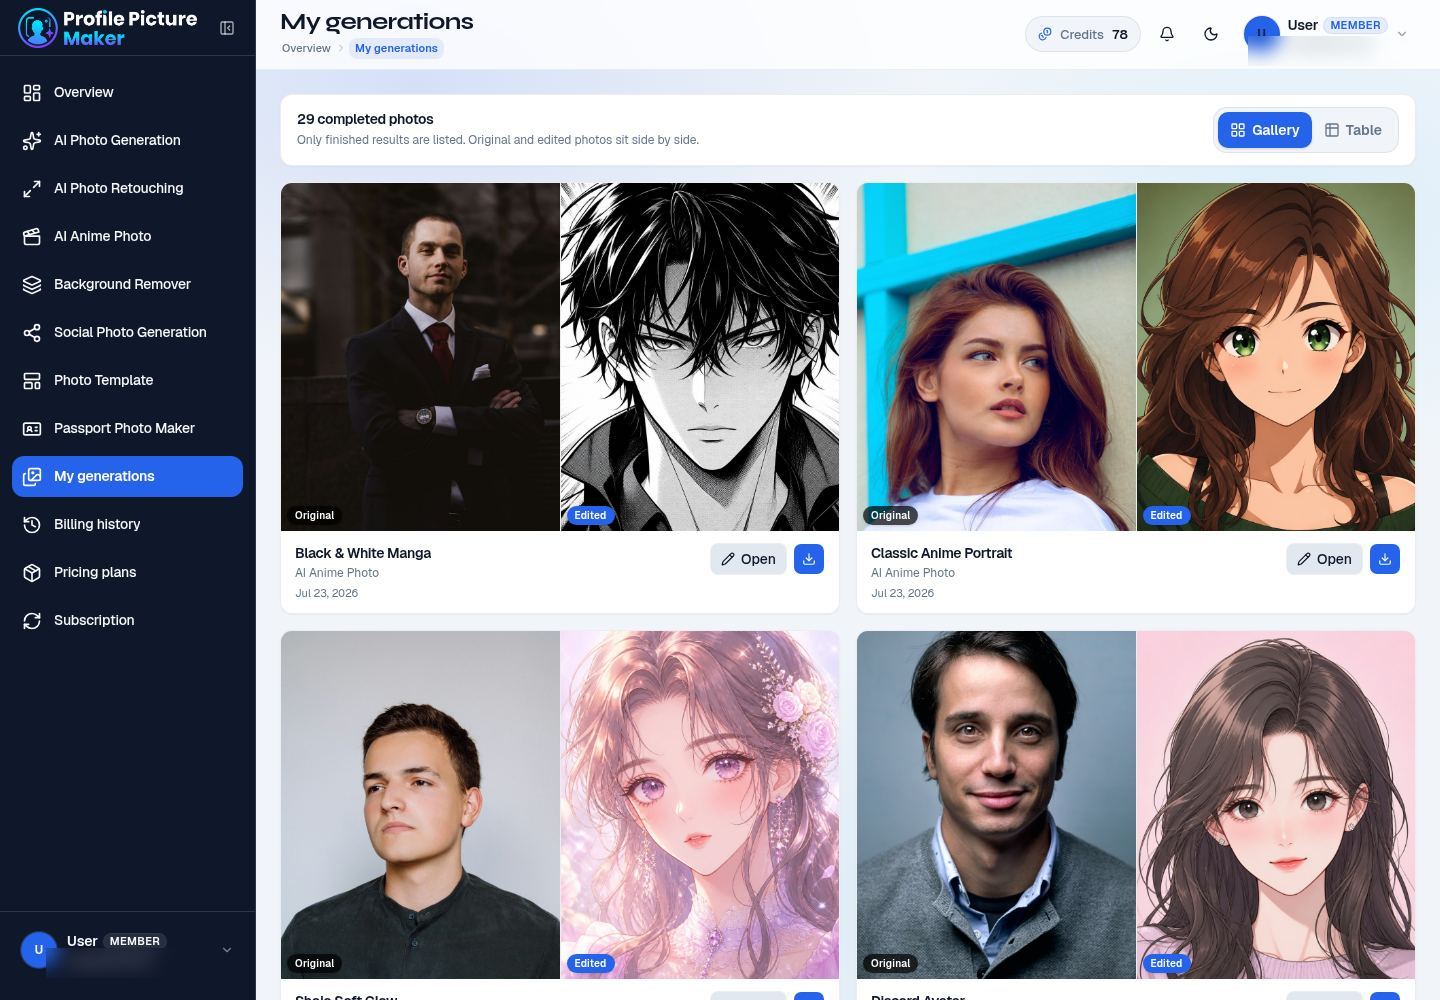
My generations is the library of finished work. The page says only completed photos are listed, and that the original and the edited photo sit side by side. Pending and failed runs stay out of this grid. Check Overview’s “in queue” card, or stay on the studio canvas, while a job is still running.
Gallery is the default. Each card shows the original and the edited photo side by side, then the result name, the studio that made it, and the date. Table switches the same records into rows when you want to scan a long history. Open, with the pencil icon, returns you to the studio for that result. The blue download icon saves the finished image.
 1
2
3
- 1Gallery and Table. Same finished photos, two layouts. Gallery is the picture view.
- 2Original and Edited sit next to each other. The manga card shows the photo you uploaded beside the finished style.
- 3Open goes back to that result. The blue download icon saves the edited file.
Profile generation cost
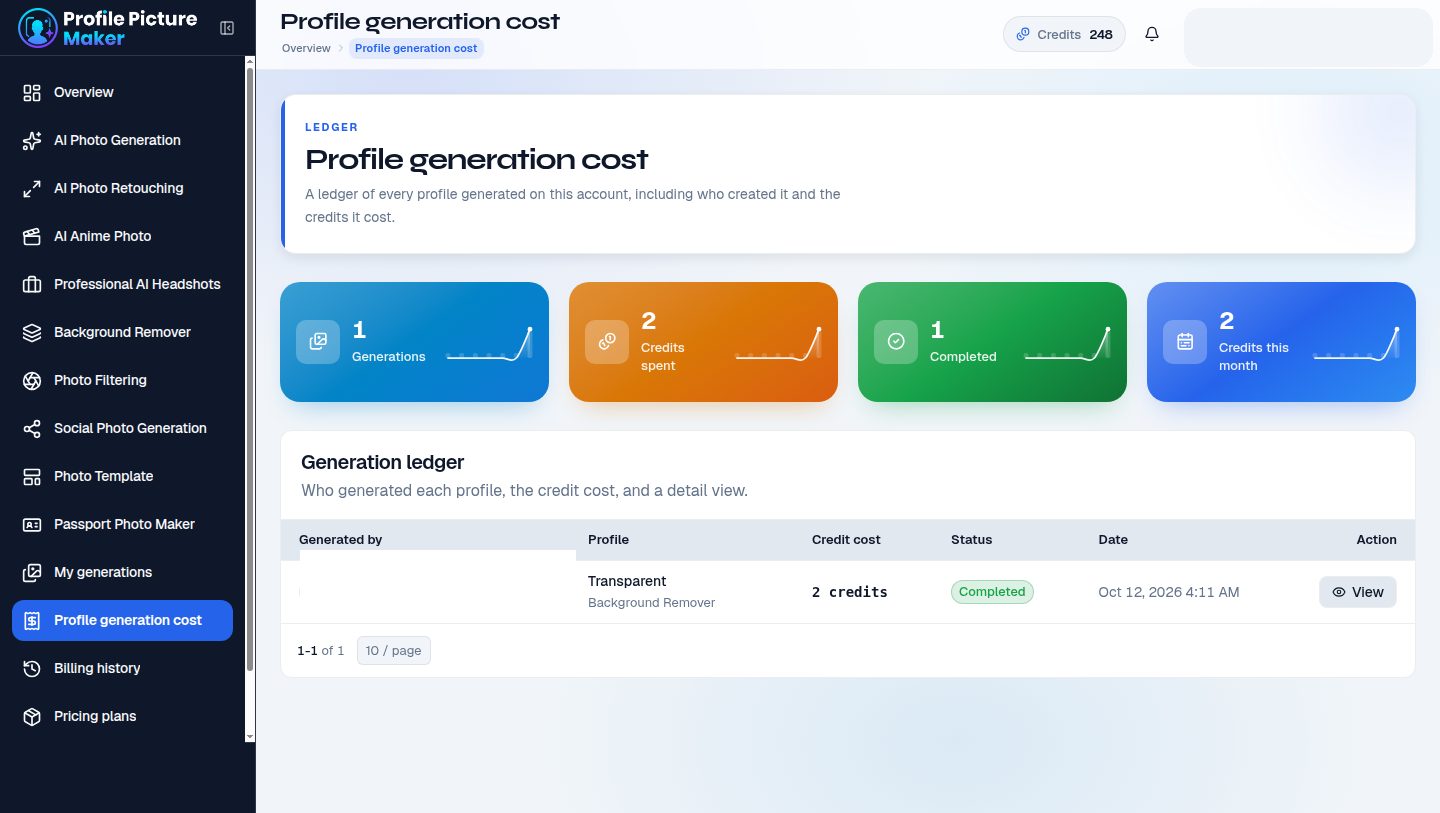
Profile generation cost is the ledger of runs on the account. The page says it lists every profile generated here, who created it, and the credits it cost. It is separate from My generations, which is the picture library, and from Billing history, which is the money ledger.
Four cards sit under the heading: Generations, Credits spent, Completed, and Credits this month. The table under them is the generation ledger. Each row has who generated it, the profile name and studio, the credit cost, a status such as Completed, Pending, Processing, or Failed, the date, and View. View opens the original and the output for that row. If a file was removed, the preview says the image was deleted.
Workspace members invited onto someone else’s plan do not see this page. The account owner does. Names in the screenshot below are covered.
 1
2
- 1Totals. How many runs exist, how many credits they spent, how many finished, and this month’s credits.
- 2Generation ledger. One row per run. View opens the photos. The name column is hidden in this screenshot.
Pricing plans
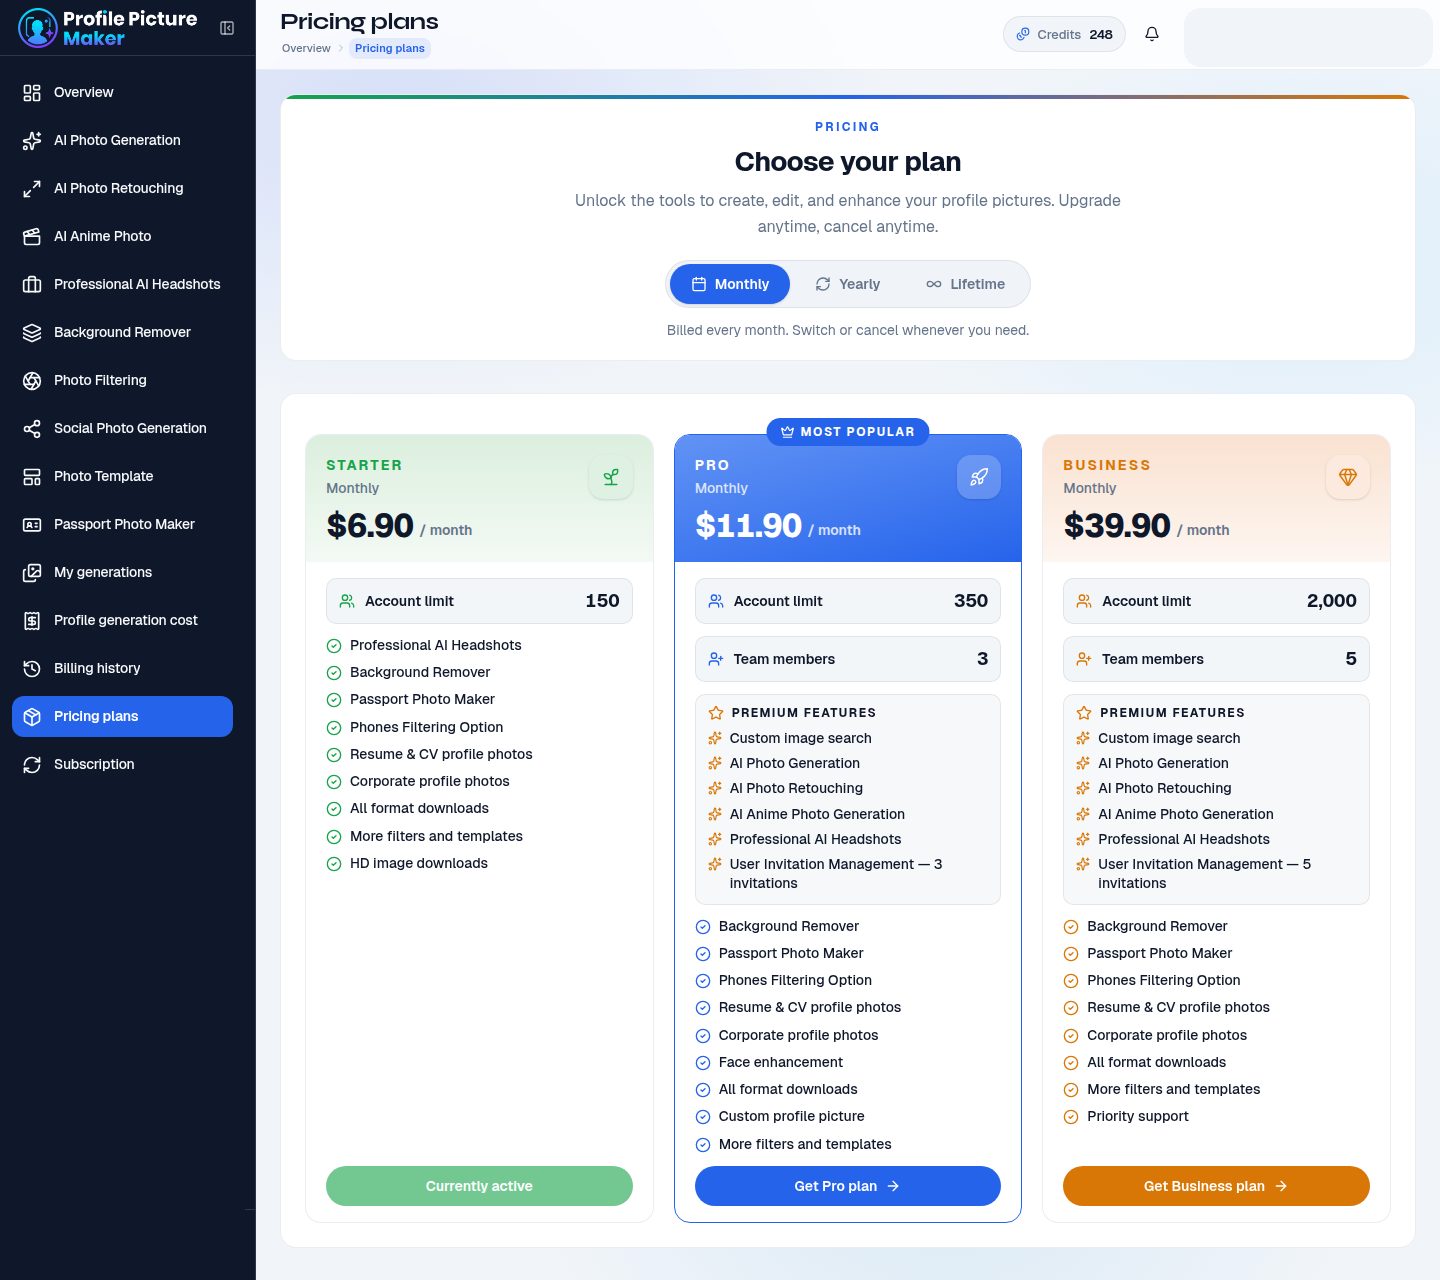
Pricing plans is where a signed-in member buys access. The heading is “Choose your plan.” Three tabs sit under it: Monthly, Yearly, and Lifetime. The line under the tabs says you can switch or cancel when you need to. The Monthly tab in this guide shows three cards. Starter is $6.90 a month with an account limit of 150, and on this account it is already active. Pro is $11.90 a month, marked Most Popular, with an account limit of 350 and 3 team members. Business is $39.90 a month with an account limit of 2,000 and 5 team members. Yearly and Lifetime use the same card layout with their own prices.
Read the list on the card before you pay. Starter lists studios and downloads. Pro and Business add a Premium features block. On this catalog that block includes custom image search, AI Photo Generation, AI Photo Retouching, AI Anime Photo Generation, Professional AI Headshots, and user invitations. A feature that is not on your card stays unavailable even after you pay. Get Pro plan or Get Business plan starts checkout. The button on the plan you already have reads Currently active.
The public pricing page can start checkout without an account. After Stripe succeeds, the app asks you to create a password for the checkout email, then opens the dashboard. Confirm that email from the Email Verify button in the top bar. When payment succeeds, the plan appears under Subscription and the payment appears under Billing history. If a price you expected is missing, the catalog has changed. Use the cards on your own account, not the prices frozen in this screenshot.
 1
2
3
4
- 1Monthly, Yearly, Lifetime. Switch tabs before you subscribe.
- 2Starter lists its price, account limit, and included tools. Currently active means this account already has it.
- 3Pro is marked Most Popular. Read the team size and the premium features before you pay.
- 4Business is the higher card. The account limit and invitation count are larger. It is not automatically unlimited.
Subscription
Subscription is the status of what you pay for, separate from the credit counter. Three cards summarize it: how many subscriptions are active, how many history rows exist, and an overall status. Under the cards, Active subscriptions lists the current plan, its billing, and the access it grants. Subscription history lists past cycles, amounts, and dates.
An account with no plan shows “No active subscription yet” and a link to pricing plans. The same link is repeated at the bottom of the page. After a successful checkout, this is the screen that should show the plan as active. If payment succeeded and this page is still empty, open Billing history first to confirm the payment was recorded, then return here. Use the plan’s own controls on the active row when you need to cancel or resume. Those controls appear on a real subscription. They are absent from the empty state in the screenshot.
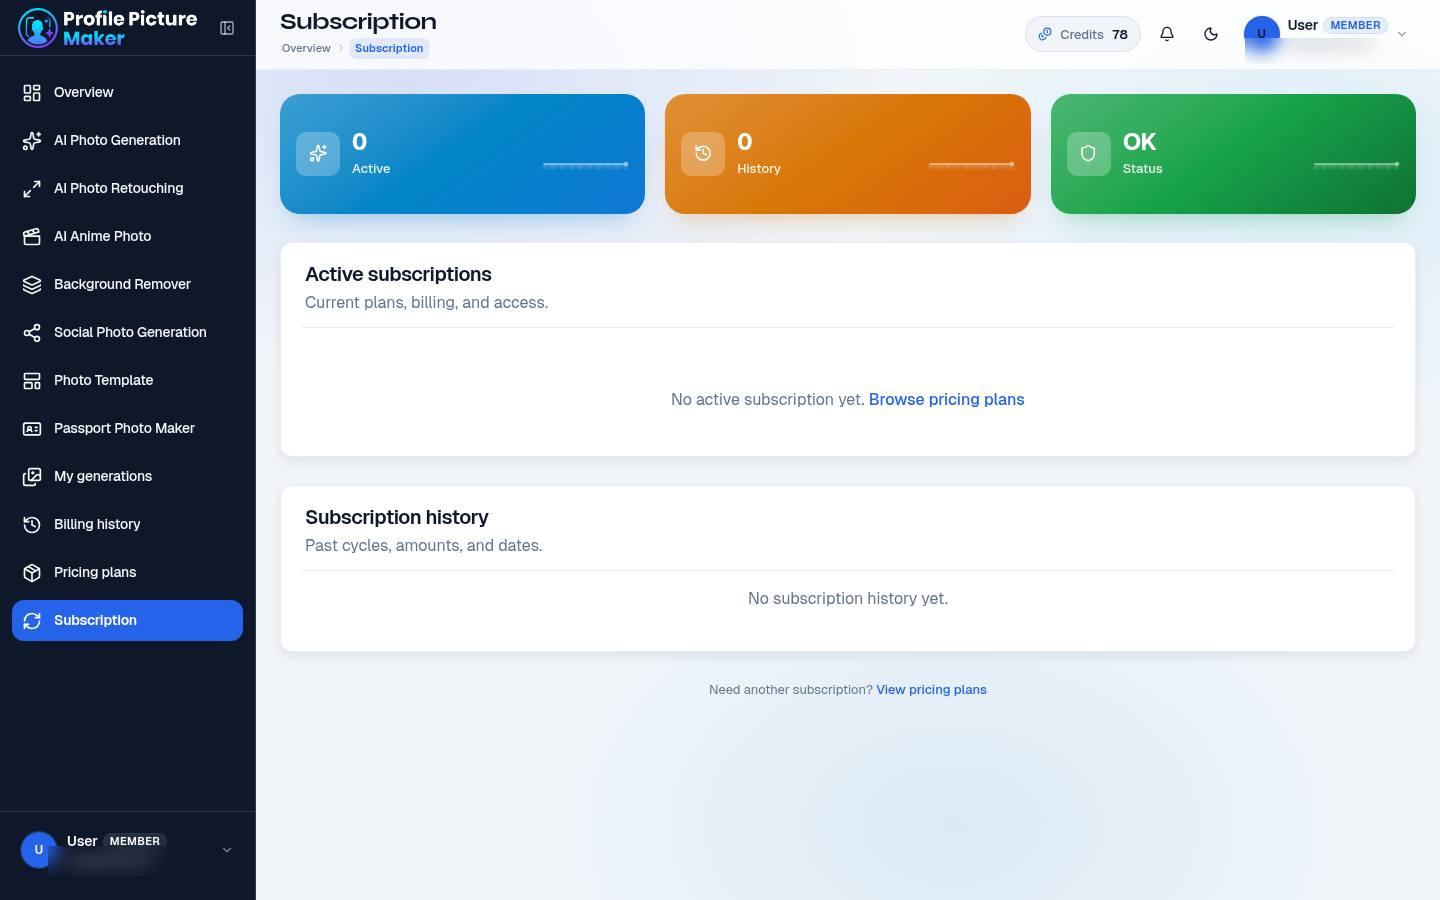
Empty subscription state. Browse pricing plans is the path to a first purchase.
Billing history
Billing history is the ledger. Payments counts every payment attempt. Invoices counts documents you can open. Paid total adds the successful charges. The payments table is the place to look when a card was declined or a checkout was abandoned, because attempts are recorded, not only successes. The invoices table is the place to view or download a receipt after a charge succeeds.
A new account with no purchases shows zero payments, zero invoices, and a paid total of $0.00, with an empty line in each table. That is a normal state, not an error. After you subscribe, come back to this page for the record. It does not change your credit balance by itself. Credits change when the plan is applied to the account.
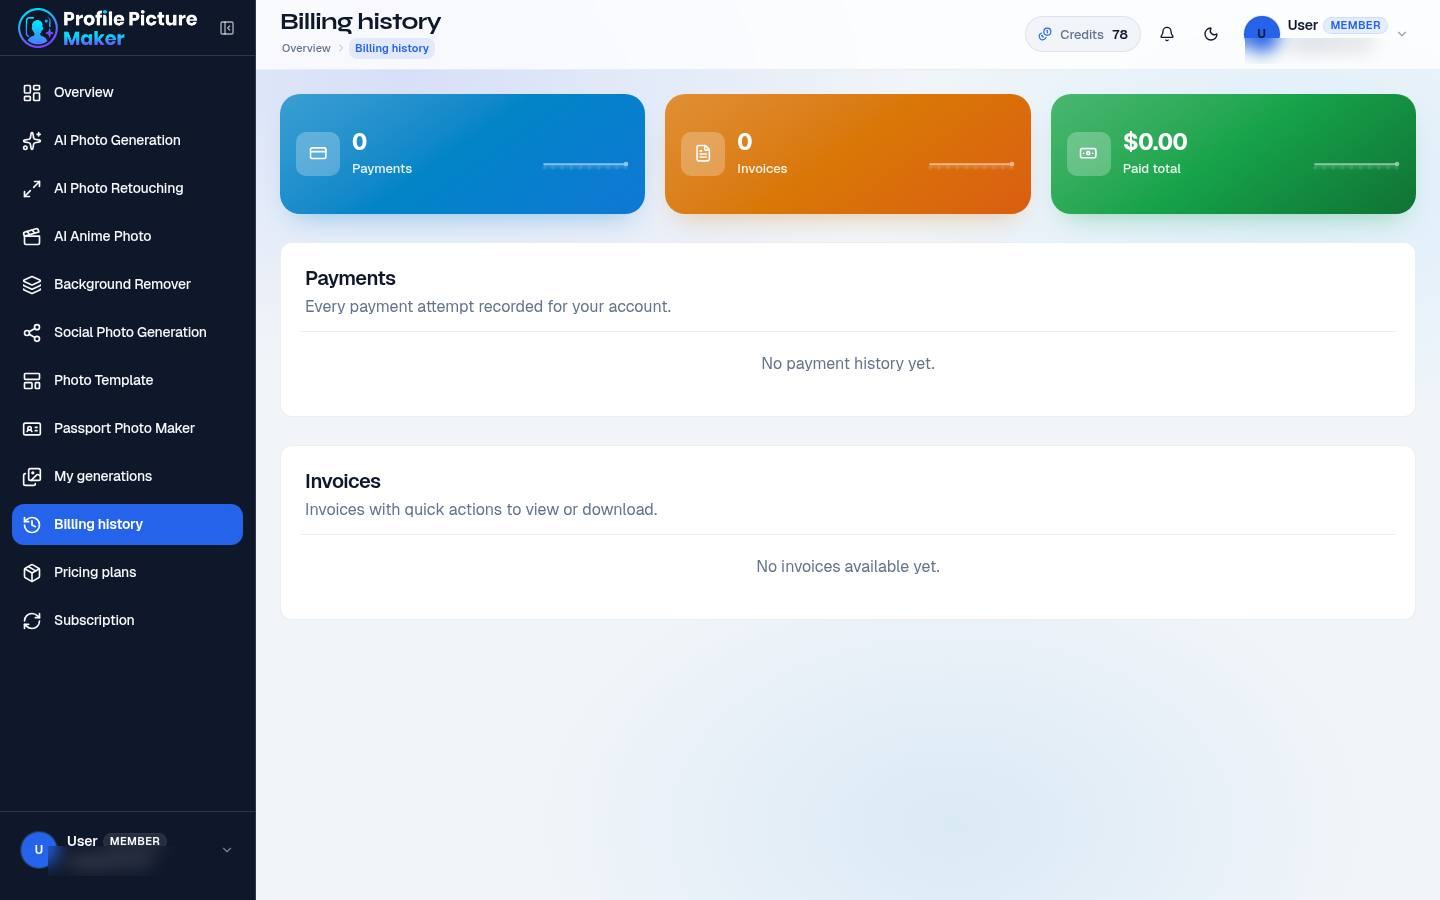
Billing history before any purchase. Payments and invoices fill in after checkout.
Profile and security
Open Profile from your account menu in the top bar. The page is split into identity, password, and account deletion. The header shows your name, a verified badge when the email is confirmed, and your account id.
The profile card stores the photo, name, and email for this session. The profile photo accepts JPG, PNG, or WebP up to 2 MB, which is a tighter limit than the 10 MB studio uploads. Upload image, edit the name or email if you need to, and press Save. The password card is separate. It asks for the current password, the new password, and a confirmation, then Update. Filling the password card does not change your name, and Save on the profile card does not change your password.
Delete account is permanent. The button asks you to confirm with your password in a dialog. Download anything you still need from My generations before you delete the account. There is no undo on that screen.
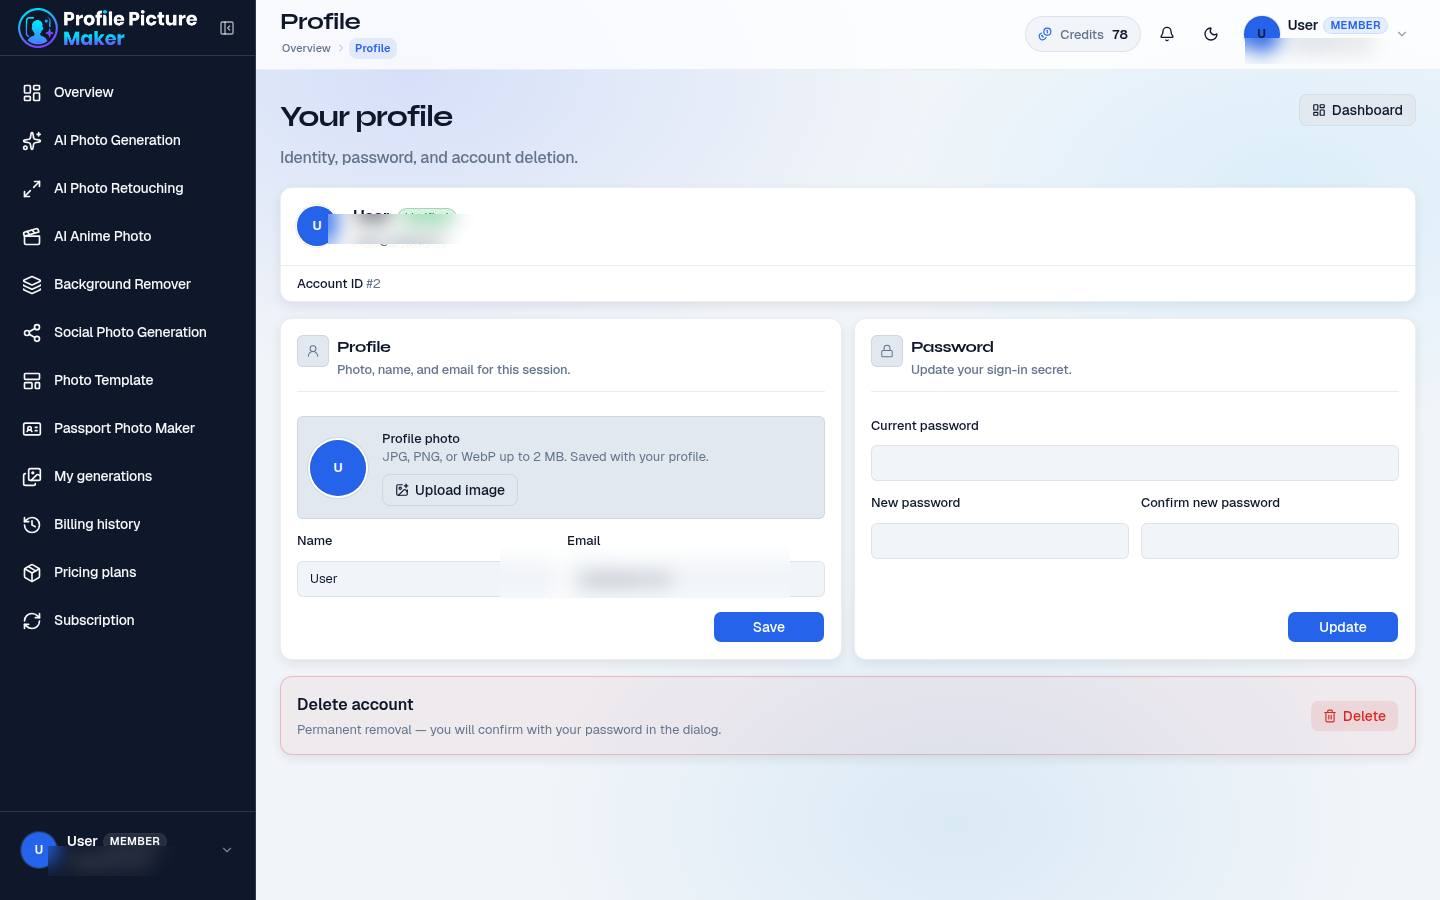
Profile on the left, password on the right, delete at the bottom. Email addresses are hidden in this screenshot.
Optional studios
UpScale Image and Animated GIF Profile appear in the sidebar only when the workspace turns them on. They are not in the sidebar screenshot earlier in this guide. If you do not see them, they are not part of your menu. Both are paid-plan studios.
UpScale Image
Upload a photo, pick a long edge, and pick a frame. The sizes are 1K (1024 px), 2K (2048 px), 4K (3840 px), and 8K (7680 px). The frame is Square at 1:1 or Landscape at 16:9. A square 2K result is 2048 × 2048. A landscape 2K result is 2048 × 1152. The canvas shows the enlarged image when the run finishes. The credit cost is printed with your balance, the same way as the other AI studios.
Animated GIF Profile
This studio turns a portrait into a short looping avatar. You choose a motion, upload the photo, and generate. Motions include Smile, Wink, Thumbs Up, Wave, Point, Nod, Thinking, Celebrate, Excited, Happy Jump, Heart Gesture, Send Love, Clap, Surprised, Cool Shades, Confetti, Magic Sparkle, and Bokeh Lights. Use a front-facing photo with the face clearly visible so the motion reads at avatar size. The result is a GIF you can download for a profile that supports animation.
Photo rules that apply everywhere
The upload hint on the studios says JPG, PNG, WEBP, HEIC, TIFF, AVIF, and more, up to 10 MB. The form converts the file to JPG or PNG. GIF and BMP are accepted as well. The profile photo on the account page is separate: JPG, PNG, or WebP, up to 2 MB.
- Use one person, facing the camera, with both eyes visible. Group photos and strong profile angles give the studios less to lock onto.
- Prefer even light and a sharp file. A small, blurry crop enlarged inside the studio will still look soft.
- For passport work, do not wear the crop tight before you upload. Leave hair and shoulders in the frame so the official head size can be set in the editor.
- For a look reference, pick a picture whose clothes and background you actually want. The face in that second photo is not the face that is kept.
- If an upload is rejected, it is almost always the file type or the 10 MB limit. Export a fresh JPG and try again.
Troubleshooting
Most blocked buttons already explain themselves in the small line under the control. Read that line before you retry. The notes below cover the cases that show up most often.
The generate button does nothing or stays disabled
The studio is waiting for an input, a free allowance, or a credit balance. AI Photo Generation needs a photo plus a prompt, or a photo plus a look reference, or a prompt alone when prompt-only mode is available. Professional AI Headshots needs a photo and a profession. Photo Filtering needs a photo. Retouching needs a source photo. Anime needs a style and a photo. A free account that has used this month’s photo, or both daily filters, sees a notice and View plans instead of the button. A paid account with a zero balance has the same block until the balance is refilled. The line under the button names the exact reason.
The studio says it is available on a paid plan
A free account can use AI Photo Generation or Professional AI Headshots once this month, and Photo Filtering for two photos a day. Each filter use returns 24 hours after you spend it. The other studios show View plans until a subscription is active. Open Pricing plans from the sidebar. If you bought from the public pricing page, finish Create your password first, then confirm the email with Email Verify in the top bar.
The 6-digit code did not arrive
Open the inbox for the address you registered, including spam. Resend code on the verification screen sends a new message. The code is six digits. A guest checkout account does not see that screen first: set the password, open the dashboard, then use Email Verify in the top bar.
A studio is missing from the sidebar
The sidebar lists only the tools enabled for the workspace. UpScale Image and Animated GIF Profile are the two that are most often hidden. Professional AI Headshots, Photo Filtering, and the other studios can be hidden the same way. You cannot turn them on from Overview. If you expected a tool and it is not listed, ask the person who manages the workspace. Profile generation cost, Pricing plans, Subscription, and Billing history are also hidden for a member who was invited onto someone else’s plan.
The result does not look like me
Use a sharper, front-facing photo and a shorter prompt that talks about clothes, light, and background. In AI Photo Generation, avoid describing a different person. Add a look reference only when you want that picture’s outfit and scene. In anime, pick a style with a realistic face proportion if you need to stay recognizable at a glance. Compare Original and Edited, or the side-by-side view, before you download.
The run failed or the canvas is still waiting
Pending and processing jobs are not failures. Overview’s “in queue” count includes them, and the canvas on the studio keeps its progress state. A failed run shows an error on that canvas. Start the job again from the same page. My generations will not list it until a result actually completes. Very large prompts, a photo of many people, or a file that barely passed the size check are the usual causes.
I paid, but I do not see the plan
Open Billing history and look at payments, not only invoices. A recorded payment means checkout finished. Then open Subscription and confirm the active row. Credits in the top bar update when the plan is applied. If the payment row says the attempt failed, the card was not charged successfully and the plan will not be active. Subscribe again from Pricing plans after checking the card.
I cannot sign in
Email sign-in needs the address and password from registration. Use Forgot? if you still have access to that inbox. Google sign-in only matches the Google account you used to join. A different Google address creates a different membership. If the password reset mail is missing, check spam and make sure you requested it for the registered address.
Download, Open, and empty thumbnails
In My generations, Open returns to the studio for that finished result. The download icon saves the edited file. Gallery and Table show the same records. A blank thumbnail with a working download means the preview did not load. Use the download. Original and edited are both labeled on the card so you do not save the source by mistake.
Where to get help from a person
Use the account email your workspace published for support, and include your account id from the Profile page, the studio name, and the time of the run. Do not send your password. For a billing question, include the date you see on Billing history. The latest copy of this guide is always at https://app.profilepicturemaker.io/help-support/.
Social Photo Generation
This studio does not restyle the person. The line under the button says crop and resize happen in your browser, and no AI is used. You pick a network, upload a photo, frame the face, and download the sizes that network expects.
Choose a social platform from the searchable list. Instagram is selected in the screenshot, and the list continues through Facebook, TikTok, YouTube, LinkedIn, X, WhatsApp, Snapchat, Discord, Pinterest, Reddit, Twitch, Telegram, Threads, Messenger, GitHub, Behance, Dribbble, Slack, Microsoft Teams, and the other profiles in that menu. Change Platform, on the colored header, reopens the choice. Each platform shows the pixel sizes it will export. For Instagram those are 320×320, 1080×1080, 150×150, 110×110, and 44×44, covering a high-resolution profile, a smaller preview, and a tiny avatar.
Upload your photo, then Generate Profile Photos. Frame the face inside the guide so the circle or rounded mask used by that network does not cut off the chin or the hair. When the sizes are ready, download them. The studio can also pack that platform’s sizes into one zip. Because this work stays in the browser, use a photo you already like: a finished AI portrait, a template export, or a picture from your camera.